A picture-perfect show ring turnout for hunter/jumper mounts includes a neat and tight tail braid. When done correctly, a tail braid accentuates your horse’s hindquarters and puts the finishing touch on your horse’s show ring look. In this blog post, we explain what materials you will need and provide some helpful tips for properly braiding a tail.
Necessary Supplies
Before you begin braiding your horse’s tail, make sure that you have the proper tools and supplies collected. You will need:
- Step stool or a grooming tote that you can stand on
- Aluminum pulling comb
- Tail brush
- Mane spray (such as Quic Braid or Mane ‘N Tail Spray N Braid)
- A small bucket of water
- Sponge
- Scissors
- Pull through tool or braiding hook
- Yarn – cut into one 24 inch length piece (Lucky Braids Braiding Yarn is popular)
When braiding your horse’s tail, you can use a color of yarn that matches the tail or one that contrasts with it (for example white yarn on a black tail). Keep in mind that a contrasting color will draw more attention to the tail braid, so it is recommended that beginner braiders use a color that matches the tail. Additionally, take note as to how your horse carries his or her tail and what circuit you are competing on. On the hunter/jumper circuit, a matching color yarn is traditionally seen; meanwhile, at breed shows, especially Morgan, Arabian, and Saddlebred shows, contrasting colors are popular.
Braiding the Tail
Once you have gathered all of the necessary supplies, you can begin braiding your horse’s tail. Start by washing your horse’s tail and gently brushing out all of the knots. Dirty tails can be bit sticky and are more difficult to braid. Work your way up the tail with your tail brush, starting at the base and moving toward the dock. This will help to organize the tail hair while minimizing the amount of breakage. Try not to use any silicone-based conditioners or sprays which will leave the hair slippery and difficult to braid. After you have brushed up the tail, take your tail brush and brush down the tail to ensure that there are no knots. Taking this time to clean and prepare the tail properly will make braiding the tail exponentially easier. Then, it is time to get started!
- While your horse is cross tied, wet the sponge in the bucket of water and use it to soak the tail hairs, particularly the hairs on the backside of the dock of a tail. This will make the tail easier to braid while minimizing the amount of flyaways. Then, carefully spray the top of the tail with the mane spray or tail mousse to help amplify your grip on the shorter top hairs.
- Stand on your step stool to begin your tail braid. This gives you leverage and helps you keep the top strands tighter.
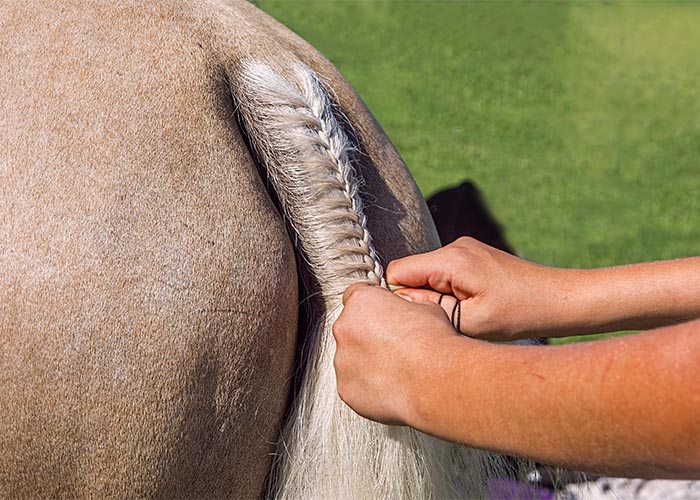
- Use the pulling comb to section off two sections of the tail from the sides of the top of the dock. For many horses, the first few twists of the tail braid will be the hardest because the tail hair is shorter and has a tendency to break at the top of the tail. Then take an equal section from the middle of the tail (if you are able to) or either side of the tail, this will be the third section of your braid.
- Tightly cross the three sections into a braid, using your thumbs to hold the braid tightly to the tail as you do so.
- After you have made your initial crosses, take small, equal pieces from each side of the tail and add it into the existing braid. This will help you to make an even french braid down the center of the tailbone. The pieces should be slightly thinner than the thickness of a pencil, even for horses with extremely thick tails (like Friesians).
- Continue working down the tail, taking pieces from the back of the tail as you work your way down. Be sure to keep the braid in the center of the tail, this is most easily done by keeping your body centered with the tail. Constantly keep the braid tightened by pushing against it with your thumbs, smoothing the hair with your fingers to keep it organized. As you get closer to the bottom of the tail, you may need to step off of your step stool (depending on the height of the horse or your height); many professional braiders like to leave the step stool in between them and the horse to provide protection against any potential kicks.
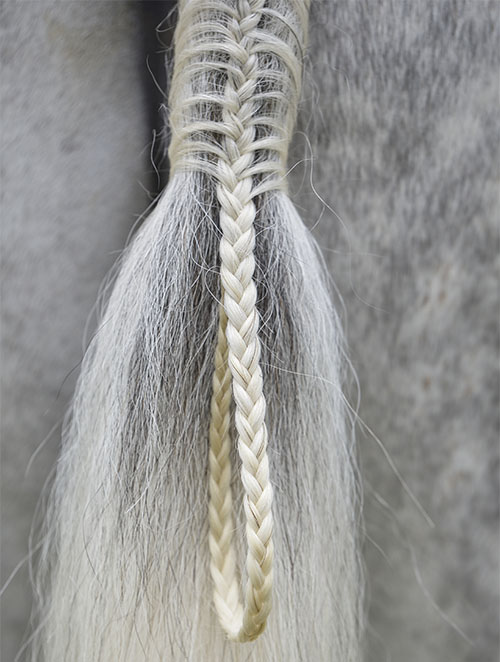
- After you have reached the bottom of the dock, there are a number of ways to complete the tail braid. These methods include a traditional pulled-up tail (which we will be discussing), pin-wheel tails, wrap-around braids, and braiding in fake tails.
- To finish up your tail braid, stop taking pieces from the side of the tail once you have reached the bottom of the dock. Then braid down approximately one inch in a traditional braid, then lay the yarn into the braid.
- Incorporate the yarn into the braid by folding the yarn in half and placing it alongside the outer two strands of hair. Then, continue braiding with the hair and yarn for one additional inch (about four to six more twists).
- Pull the yarn to the side of the braid, holding the braid tightly in your non-dominant hand and the yarn in your dominant hand. Move the yarn over the top of the braid, then pull the end of the yarn through the loop that you have just made to make a tight knot.
- Use your pull through to measure the length of the braid, then insert the pull through alongside the tail braid at the same height. Pull one length of yarn through one side of the braid and the other piece of yarn through the other side of the braid. Use one hand to pull the pieces of yarn up and your other hand to carefully guide the excess braid under the tail braid. You may need to stick your finger up through the braid to help guide the braid, especially if it is a nice tight braid.
- Then, use two surgical knots (double medical knots) to secure the tail braid. Clip the strings.
- In order to take the pressure off the fragile top hairs, take the excess yarn that you have just cut off and use your pull through to pull a piece of yarn behind the braid. Again, use two surgical knots to secure it and then clip the extra with scissors.
- If you are not showing right away, consider wrapping your horse’s tail to protect the delicate hairs and keep the braid tight. Many equestrians use damp turf bandages to keep the hair lying flat.
Practice makes perfect! When it comes to braiding tails, the key to tight braids is patience and lots of practice. For a video demonstration on how to braid a tail, we encourage you to refer to this video:
An exceptional tail braid puts the final touch on a professional show ring turnout. If you have any questions regarding the tail braiding process or would like assistance choosing the proper tools for your tail braid, we encourage you to speak to a member of our friendly and highly trained sales staff.